Jenkins and github integration for the testinggoat book
July 30, 2018, 2:18 p.m. wschaub linux TDD
This article describes my Jenkins setup for going through the book Test-Driven Development with Python
We will discuss the following steps:
- Initial linode setup (Ubuntu 16.04LTS)
- securing your linode
- setting up jenkins
- Nginx reverse proxy for jenkins with free SSL using let's encrypt
- github integration with protected branches based on our tests
- better tracking and presentation of our test runs via xUnit (as per John Fitzpatrick's suggestion on the Chapter 24 page of the book)
Initial linode setup (Securing your linode)
You can use whatever virtual host you are most comfortable with. I chose linode for the purposes of this document.
- Spin up a standard 10$ 2GB ram linode.
- click "deploy an image" on the dashboard and select Ubuntu 16.04 LTS and set the swap to 512MB set a strong root password here. I use KeePass2 to generate,store and keep track of my passwords securely.
- click on the remote access tab and copy down the hostname of the new linode. it should look something like lixxx-xxx.members.linode.com
- scp $HOME/.ssh/id_rsa.pub root@lixxx-xxx.members.linode.com:
- ssh root@lixxx-xxx.members.linode.com and put in your generated password.
- edit /etc/ssh/sshd_config and make sure you have PermitRootLogin no
and PasswordAuthentication no in the file then systemctl restart ssh - apt-get update && apt-get dist-upgrade
- adduser myusername
- adduser myusername sudo
- cp id_rsa.pub /home/myusername
- su - myusername
- mkdir .ssh
- cp id_rsa.pub .ssh/authorized_keys
- (from another terminal) ssh -v myusername@lixxx-xxx.members.linode.com and verify that you can log in with your public ssh key.
- (from the same second terminal) run sudo su and make sure sudo works for your new user
- log out of the first terminal and continue setup from your regular user account
At this point you have updated all the packages to the latest version and have disabled root logins via SSH. you have also disabled any logins over SSH that aren't via a public/private key authentication. This should foil any SSH bruteforce bots that are trying to crack your SSH password. (for further reading you should also check out https://www.linode.com/docs/security/securing-your-server/)
Set up firewall
The easiest firewall to use is ufw. Just use the following steps:
- sudo apt-get install ufw
- sudo ufw allow ssh
- sudo ufw allow http
- sudo ufw allow https
- sudo ufw enable
- sudo reboot
When the machine comes back up you will have only ports 22, 80 and 443 open on both ipv6 and ipv4.
We need to set up a host name for this machine on a domain that we control. I'm assuming that if you got this far in the testinggoat book that you already have this part figured out. I'm going to refer to the host as jenkins.example.com from now on in this document. set it up in your DNS and then ssh to the host to test that it works.
once you know that it works you can set the machine's hostname using sudo hostnamectl set-hostname jenkins.example.com
Make extra swap permanent
First let's add some extra swap like the book says. once you're done however add the new swapfile to /etc/fstab like this :
# /etc/fstab: static file system information.
#
# Use 'blkid' to print the universally unique identifier for a
# device; this may be used with UUID= as a more robust way to name devices
# that works even if disks are added and removed. See fstab(5).
#
# <file system> <mount point>   <type>  <options>       <dump>  <pass>
/dev/sda       /               ext4    errors=remount-ro 0       1
/dev/sdb         none            swap    sw              0       0
/swapfile        none            swap    sw              0       0
The important line here is:
/swapfile none swap sw 0 0
Don't edit anything else in /etc/fstab just add this line. The importance of this is that without it your new 4GB swap area will disappear on the next reboot.
Install the basic packages we need for jenkins
sudo apt-get install build-essential openjdk-8-jre-headless  vim-nox htop tree
sudo add-apt-repository ppa:deadsnakes/ppa
sudo apt-get update
sudo apt-get install firefox python3.6-venv python3.6-dev xvfb libssl-dev libffi-dev
Install geckodriver
wget https://github.com/mozilla/geckodriver/releases/download/v0.21.0/geckodriver-v0.21.0-linux64.tar.gz
tar -xvzf geckodriver-v0.21.0-linux64.tar.gz
sudo install geckodriver /usr/local/bin/geckodriver
geckodriver --version
geckodriver 0.21.0

The source code of this program is available from
testing/geckodriver in https://hg.mozilla.org/mozilla-central.

This program is subject to the terms of the Mozilla Public License 2.0.
You can obtain a copy of the license at https://mozilla.org/MPL/2.0/.
Install certbot and get our SSL certificate
This section is all about getting our certificate with certbot through Let's Encrypt There's no excuses anymore for not using SSL in 2018. Even more so with something like Jenkins which could very well be quite security sensitive. Let's Encrypt gives us a free SSL cert as long as we can prove we control a website under the domain we request a cert for. Please read their legal agreement carefully before continuing with this step.
First install nginx:
sudo apt-get install nginx
Next install certbot you canfollow the directions here
Once you have certbot installed your session will look a lot like this one:
wschaub@temp:~$ sudo certbot --nginx
Saving debug log to /var/log/letsencrypt/letsencrypt.log
Plugins selected: Authenticator nginx, Installer nginx
Enter email address (used for urgent renewal and security notices) (Enter 'c' to
cancel): myaddress@example.com
Starting new HTTPS connection (1): acme-v02.api.letsencrypt.org

- - - - - - - - - - - - - - - - - - - - - - - - - - - - - - - - - - - - - - - -
Please read the Terms of Service at
https://letsencrypt.org/documents/LE-SA-v1.2-November-15-2017.pdf. You must
agree in order to register with the ACME server at
https://acme-v02.api.letsencrypt.org/directory
- - - - - - - - - - - - - - - - - - - - - - - - - - - - - - - - - - - - - - - -
(A)gree/(C)ancel: a

- - - - - - - - - - - - - - - - - - - - - - - - - - - - - - - - - - - - - - - -
Would you be willing to share your email address with the Electronic Frontier
Foundation, a founding partner of the Let's Encrypt project and the non-profit
organization that develops Certbot? We'd like to send you email about our work
encrypting the web, EFF news, campaigns, and ways to support digital freedom.
- - - - - - - - - - - - - - - - - - - - - - - - - - - - - - - - - - - - - - - -
(Y)es/(N)o: y
Starting new HTTPS connection (1): supporters.eff.org
No names were found in your configuration files. Please enter in your domain
name(s) (comma and/or space separated)  (Enter 'c' to cancel): jenkins.example.com
Obtaining a new certificate
Performing the following challenges:
http-01 challenge for jenkins.example.com
Waiting for verification...
Cleaning up challenges
Deploying Certificate to VirtualHost /etc/nginx/sites-enabled/default

Please choose whether or not to redirect HTTP traffic to HTTPS, removing HTTP access.
- - - - - - - - - - - - - - - - - - - - - - - - - - - - - - - - - - - - - - - -
1: No redirect - Make no further changes to the webserver configuration.
2: Redirect - Make all requests redirect to secure HTTPS access. Choose this for
new sites, or if you're confident your site works on HTTPS. You can undo this
change by editing your web server's configuration.
- - - - - - - - - - - - - - - - - - - - - - - - - - - - - - - - - - - - - - - -
Select the appropriate number [1-2] then [enter] (press 'c' to cancel): 2
Redirecting all traffic on port 80 to ssl in /etc/nginx/sites-enabled/default

- - - - - - - - - - - - - - - - - - - - - - - - - - - - - - - - - - - - - - - -
Congratulations! You have successfully enabled https://jenkins.example.com

You should test your configuration at:
https://www.ssllabs.com/ssltest/analyze.html?d=jenkins.example.com
- - - - - - - - - - - - - - - - - - - - - - - - - - - - - - - - - - - - - - - -

IMPORTANT NOTES:
 - Congratulations! Your certificate and chain have been saved at:
   /etc/letsencrypt/live/jenkins.example.com/fullchain.pem
   Your key file has been saved at:
   /etc/letsencrypt/live/jenkins.example.com/privkey.pem
   Your cert will expire on 2018-10-20. To obtain a new or tweaked
   version of this certificate in the future, simply run certbot again
   with the "certonly" option. To non-interactively renew *all* of
   your certificates, run "certbot renew"
 - Your account credentials have been saved in your Certbot
   configuration directory at /etc/letsencrypt. You should make a
   secure backup of this folder now. This configuration directory will
   also contain certificates and private keys obtained by Certbot so
   making regular backups of this folder is ideal.
 - If you like Certbot, please consider supporting our work by:

   Donating to ISRG / Let's Encrypt:   https://letsencrypt.org/donate
   Donating to EFF:                    https://eff.org/donate-le
Configure nginx for Jenkins
We now have an ssl cert and the default nginx site (which is useless) has been setup by certbot to have our certificate. This isn't good enough. We need to carry out the following steps
- sudo rm /etc/nginx/sites-enabled/default
- sudo rm /etc/nginx/sites-available/default
- add the following file to /etc/nginx/sites-available/jenkins.example.com
upstream jenkins {
  server 127.0.0.1:8080 fail_timeout=0;
}

server {
  listen 80;
  server_name jenkins.example.com;
  return 301 https://$host$request_uri;
}

server {
  listen [::]:443 ssl;
  listen 443 ssl;
  server_name jenkins.example.com;
    ssl_certificate /etc/letsencrypt/live/jenkins.example.com/fullchain.pem; # managed by Certbot
    ssl_certificate_key /etc/letsencrypt/live/jenkins.example.com/privkey.pem; # managed by Certbot
    include /etc/letsencrypt/options-ssl-nginx.conf; # managed by Certbot
    ssl_dhparam /etc/letsencrypt/ssl-dhparams.pem; # managed by Certbot

  location / {
    proxy_set_header        Host $host:$server_port;
    proxy_set_header        X-Real-IP $remote_addr;
    proxy_set_header        X-Forwarded-For $proxy_add_x_forwarded_for;
    proxy_set_header        X-Forwarded-Proto $scheme;
    proxy_redirect http:// https://;
    proxy_pass              http://jenkins;
    # Required for new HTTP-based CLI
    proxy_http_version 1.1;
    proxy_request_buffering off;
    proxy_buffering off; # Required for HTTP-based CLI to work over SSL
    # workaround for https://issues.jenkins-ci.org/browse/JENKINS-45651
    add_header 'X-SSH-Endpoint' 'jenkins.example.com:50022' always;
  }

}
- cd /etc/nginx/sites-enabled
- sudo ln -s /etc/nginx/sites-available/jenkins.example.com
- sudo certbot --nginx
- follow the example session below for certbot
wschaub@temp:/etc/nginx/sites-enabled$ sudo certbot --nginx
Saving debug log to /var/log/letsencrypt/letsencrypt.log
Plugins selected: Authenticator nginx, Installer nginx
Starting new HTTPS connection (1): acme-v02.api.letsencrypt.org

Which names would you like to activate HTTPS for?
- - - - - - - - - - - - - - - - - - - - - - - - - - - - - - - - - - - - - - - -
1: jenkins.example.com
- - - - - - - - - - - - - - - - - - - - - - - - - - - - - - - - - - - - - - - -
Select the appropriate numbers separated by commas and/or spaces, or leave input
blank to select all options shown (Enter 'c' to cancel): 1
Cert not yet due for renewal

You have an existing certificate that has exactly the same domains or certificate name you requested and isn't close to expiry.
(ref: /etc/letsencrypt/renewal/jenkins.example.com.conf)

What would you like to do?
- - - - - - - - - - - - - - - - - - - - - - - - - - - - - - - - - - - - - - - -
1: Attempt to reinstall this existing certificate
2: Renew & replace the cert (limit ~5 per 7 days)
- - - - - - - - - - - - - - - - - - - - - - - - - - - - - - - - - - - - - - - -
Select the appropriate number [1-2] then [enter] (press 'c' to cancel): 1
Keeping the existing certificate
Deploying Certificate to VirtualHost /etc/nginx/sites-enabled/jenkins.example.com

Please choose whether or not to redirect HTTP traffic to HTTPS, removing HTTP access.
- - - - - - - - - - - - - - - - - - - - - - - - - - - - - - - - - - - - - - - -
1: No redirect - Make no further changes to the webserver configuration.
2: Redirect - Make all requests redirect to secure HTTPS access. Choose this for
new sites, or if you're confident your site works on HTTPS. You can undo this
change by editing your web server's configuration.
- - - - - - - - - - - - - - - - - - - - - - - - - - - - - - - - - - - - - - - -
Select the appropriate number [1-2] then [enter] (press 'c' to cancel): 1

- - - - - - - - - - - - - - - - - - - - - - - - - - - - - - - - - - - - - - - -
Congratulations! You have successfully enabled https://jenkins.example.com

You should test your configuration at:
https://www.ssllabs.com/ssltest/analyze.html?d=jenkins.example.com
- - - - - - - - - - - - - - - - - - - - - - - - - - - - - - - - - - - - - - - -

IMPORTANT NOTES:
 - Congratulations! Your certificate and chain have been saved at:
   /etc/letsencrypt/live/jenkins.example.com/fullchain.pem
   Your key file has been saved at:
   /etc/letsencrypt/live/jenkins.example.com/privkey.pem
   Your cert will expire on 2018-10-20. To obtain a new or tweaked
   version of this certificate in the future, simply run certbot again
   with the "certonly" option. To non-interactively renew *all* of
   your certificates, run "certbot renew"
 - If you like Certbot, please consider supporting our work by:

   Donating to ISRG / Let's Encrypt:   https://letsencrypt.org/donate
   Donating to EFF:                    https://eff.org/donate-le
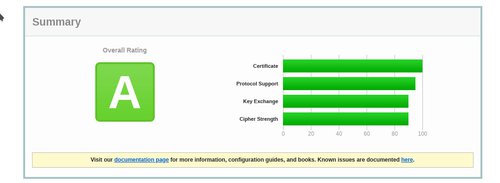
Now type sudo systemctl restart nginx and go to https://www.ssllabs.com/ssltest/analyze.html and enter in your full domain name (eg whatever jenkins.example.com has been edited to be on your end) you should see a page that looks like this:
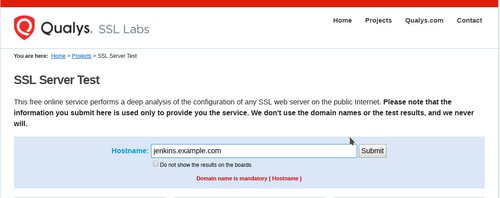
click the submit button and you should eventually get a page that has this at the top of it:
Finally time to install Jenkins
We are now ready to install Jenkins
wget -q -O - https://pkg.jenkins.io/debian/jenkins-ci.org.key | sudo apt-key add -
echo deb http://pkg.jenkins.io/debian-stable binary/ | sudo tee /etc/apt/sources.list.d/jenkins.list
sudo apt update
sudo apt install jenkins
Now go to https://jenkins.example.com (remember to use the DNS hostname that you setup here)
and we should finally see
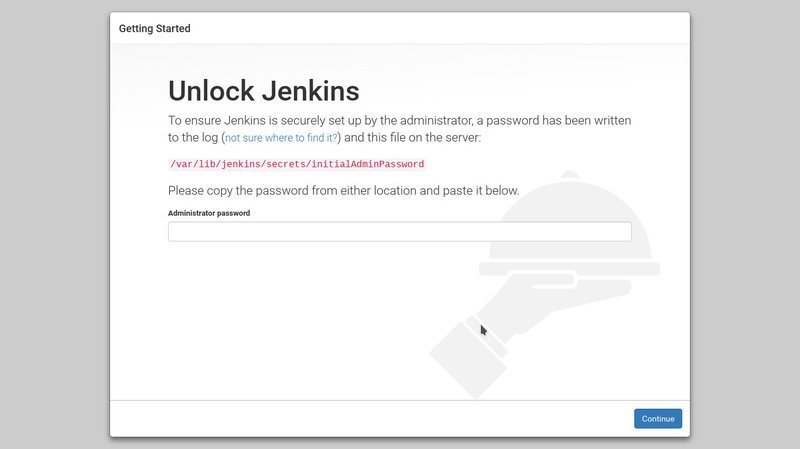
You are now ready to continue on setting up Jenkins inside its web interface as described inChapter 24 just use https://jenkins.example.com (your full hostname) instead of jenkins.example.com:8080 (in fact this should not connect because we have it firewalled off early on in this document)
Once you're finished following the instructions at http://www.obeythetestinggoat.com/book/chapter_CI.html come back here for more.
Github integration:
install the following extra plugins:
- Github Integration
- Github Autostatus
- xUnit
choose download and install after restart and then check the box to restart jenkins when it's done.
Authenticate yourself with the GitHub API
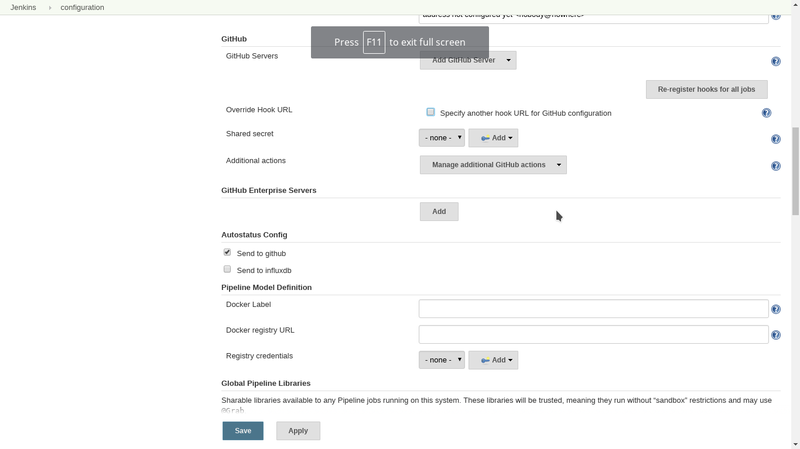
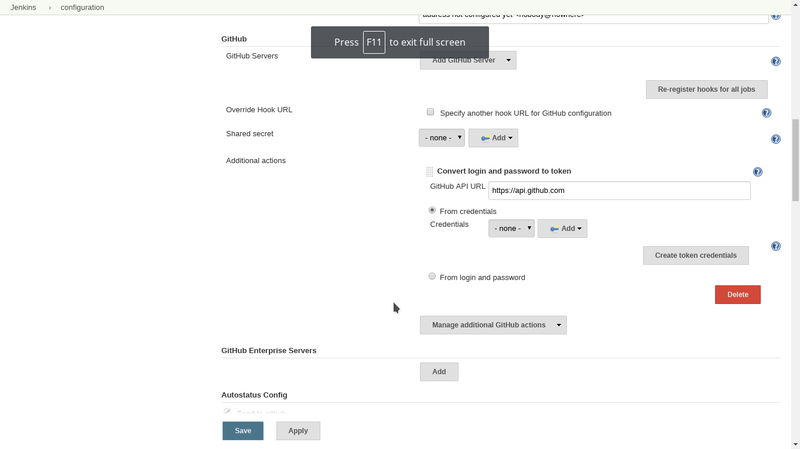
Go to Manage Jenkins -> Configure System and scroll down to Github then click on add github server:
Click on Manage additional GitHub actions and select convert login and password to token. You will get this screen:
Click from login and password
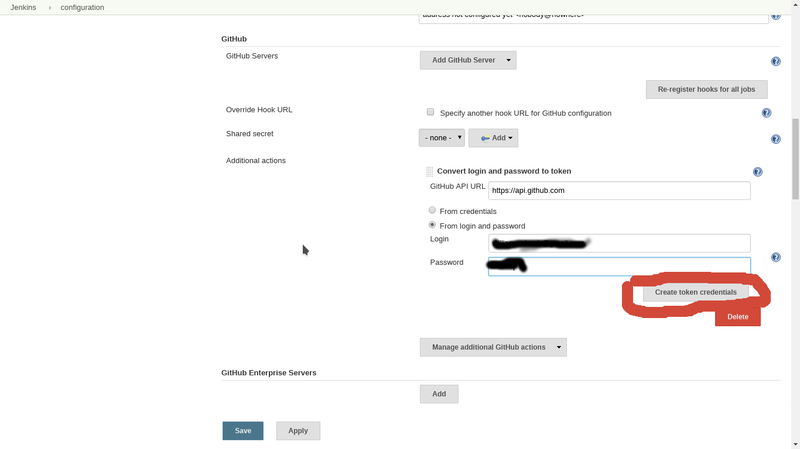
click create token credentials you should see this text appear in the current window.
"Created credentials with id xxxxxxx-xxxx-xxxx-xxxx-xxxxxx (can use it for GitHub Server Config)"
the Xs will of course be your unique ID.
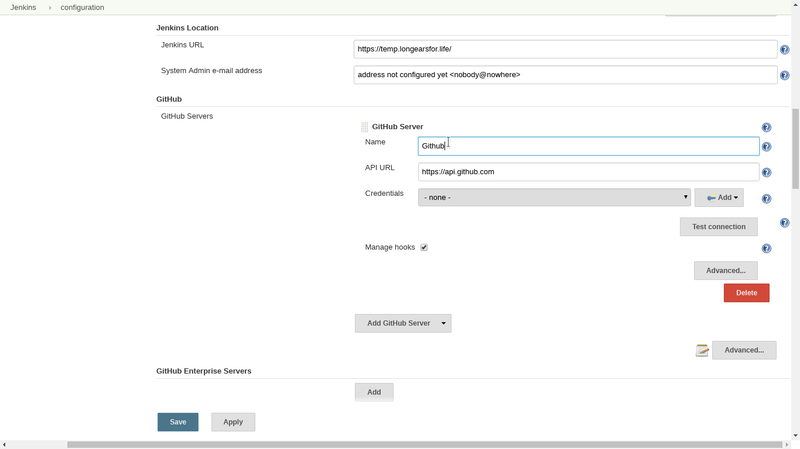
Click apply and then go back to the main jenkins page and come back. You will want to click add Github server.
Select Github server and you will see a screen like this:
click on the credentials dropdown and select your github token and click on test
you should see a screen very much like this one:
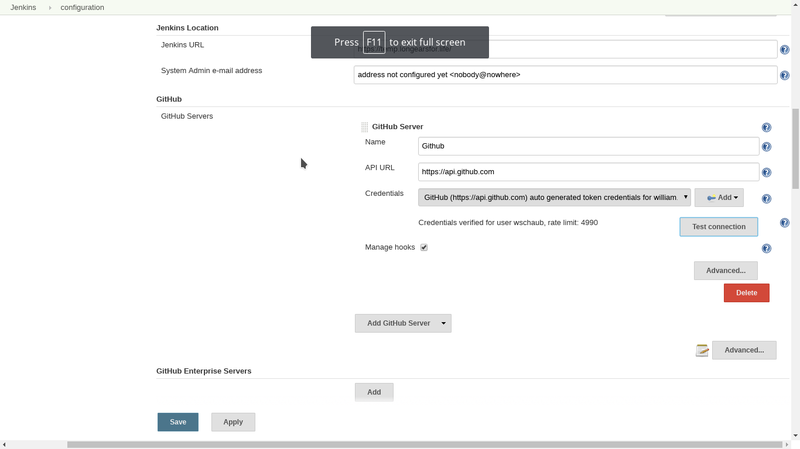
If it says the credentials are verified we are good to go. it will now be possible to send status reports to github for use in branch protection and other things. we will also be able to register webhooks automatically with github for triggering Jenkins builds immediately without the need for polling.
Add github integration to your superlists project
I'm assuming you've gone through the Chapter 24 setup instructions in jenkins so I won't repeat them here Instead I'm going to provide screenshots a a working superlists job config.
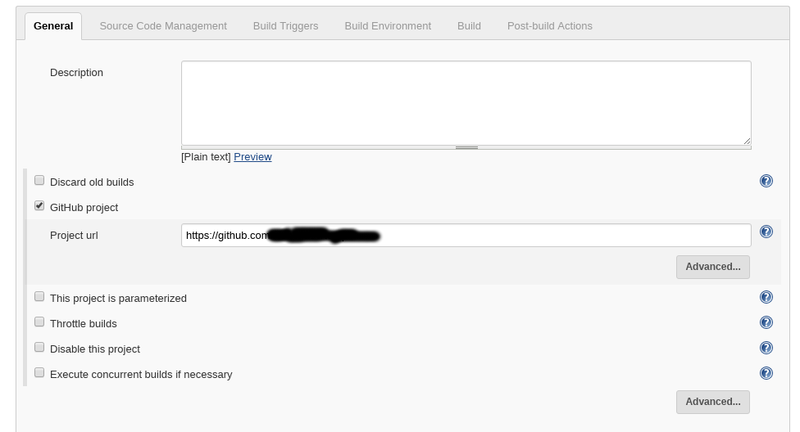
- go to your project page in jenkins and check the mark next to GitHub project in General Then put the full URL to your github project in the Project url
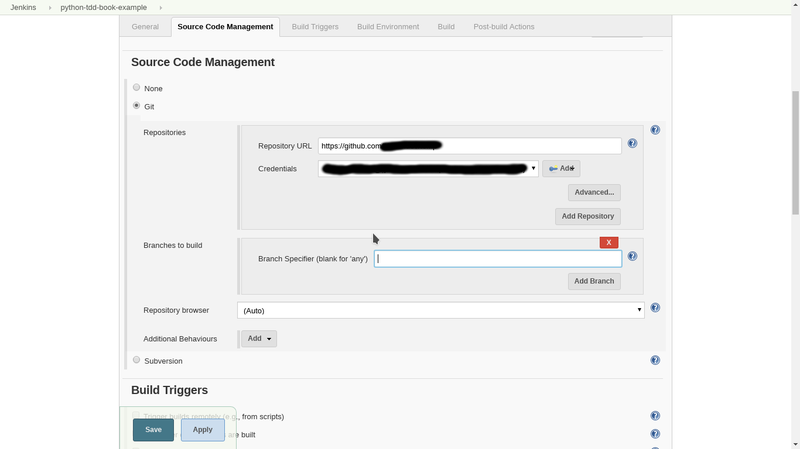
- go to source code management and make the branch specifier blank. This will allow any branch to be built by jenkins in response to callbacks from the github webhooks (next step)
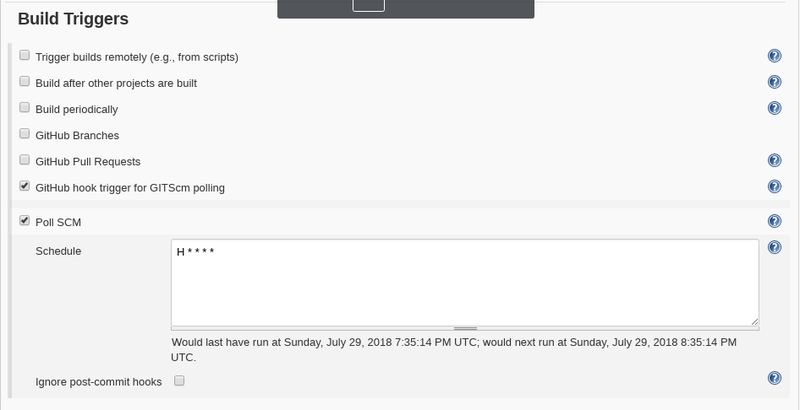
- got to Build Triggers and check the box labeled GitHub hook trigger for "GITScm polling"
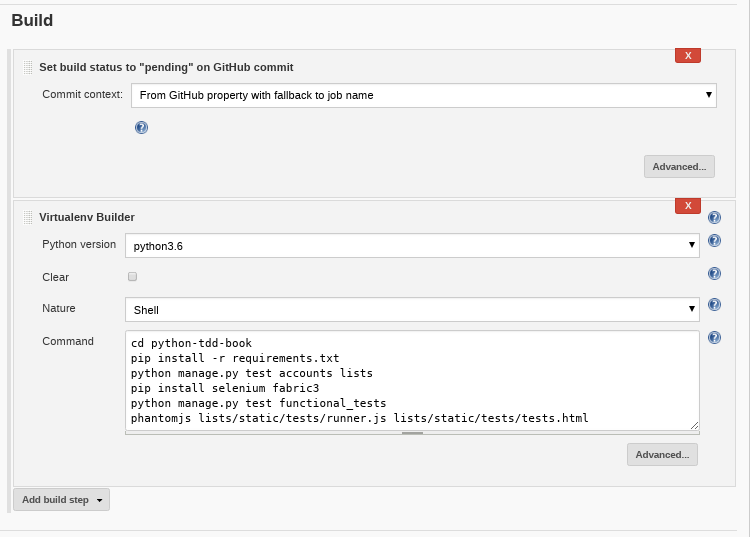
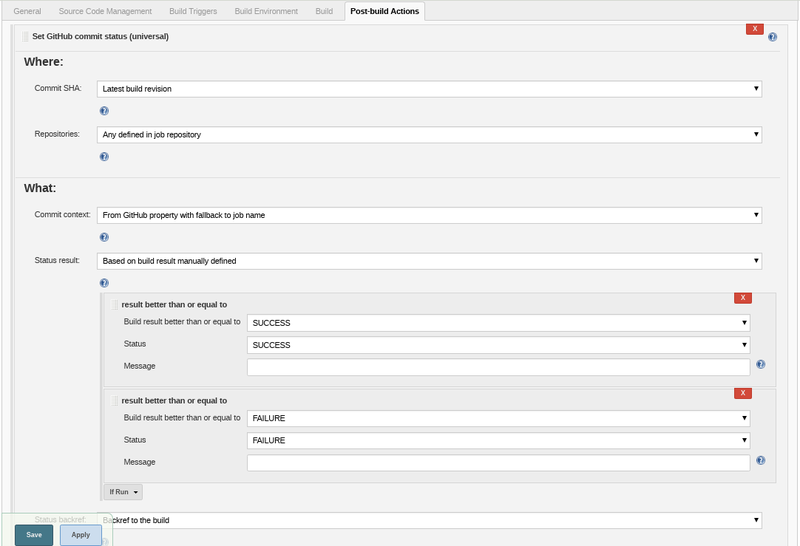
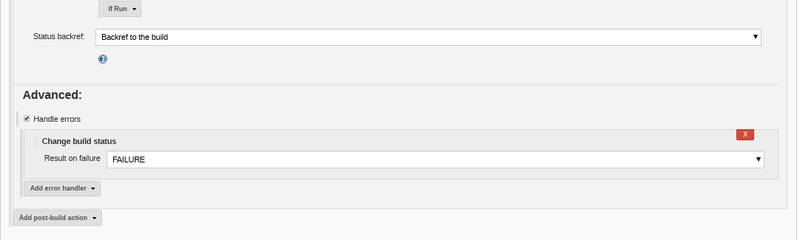
- go to the Build section and click add build step. select "set status to "pending" on GitHub ..." then drag the new box that appears so that it comes before our virtualenv builder in the browser window. like this:
- go to the post build actions section and click add post build action, then make it look like the screen below. (you will have to click advanced for the error handler stuff to show up) There's an easier option but it's deprecated.
- click save and manually kick off a build of your project in Jenkins.
Configuring the github side of things
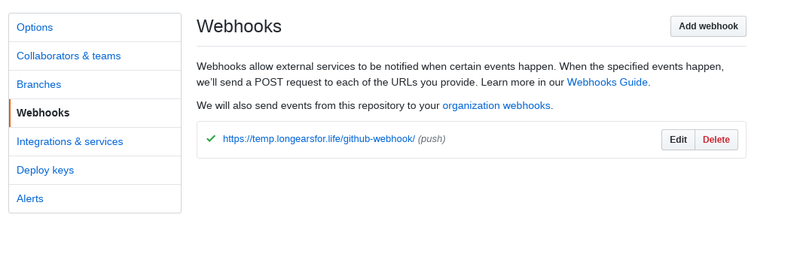
- Go to your github projects web page and then click on settings and then webhooks. If everything went well our jenkins server has registered a webhook for us that triggers on any push to the repo. (you can add other triggers but this is beyond the scope of this document and pretty easy to figure out anyway)
Setting up branch protection
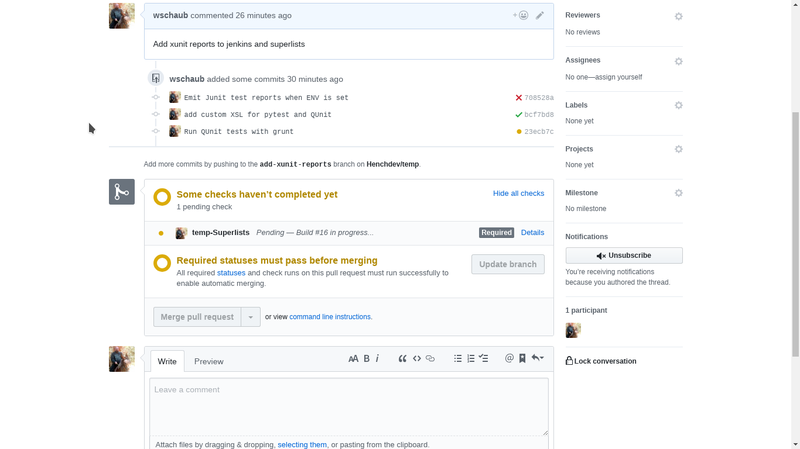
The real benefit of integrating Jenkins to github is for implementing a protected master branch and using a branch and pull request workflow. pushing to branches causes Jenkins to send a status report to github which is required to pass in order for the pull request to be merged. For example:
Failed tests, can't merge pull request:
Passing tests, can merge pull request:
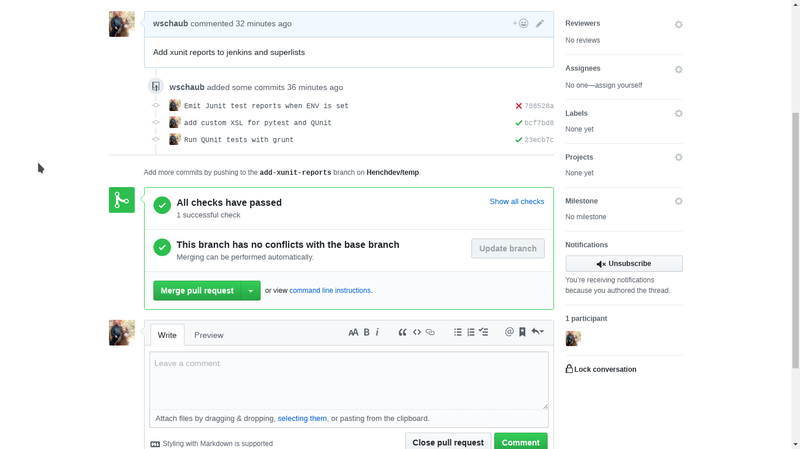
You can be directly linked to jenkins at any time by clicking on the yellow, red or green status marks next to the commits in the window. This gives you an opportunity to see what tests are failing or even fix problems with the Jenkins build definition that are causing the build failure. once you kick off a new build that works the status on that commit will change. (or if it's not a build definition problem simply push up a change that resolves the issue and then the pull request will be able to be merged.)
Setting up protected branches
Now that we know what protected branches and status updated from Jenkins can do for us let's set it up. You should have run at least one build and made sure that we have registered a webhook with github before this step so we can select a status to tie the pull requests to.
- go to settings in your github repo and select branches. go to protected branches and choose master from the dropdown. Finally make it look like this screen. The status you select (there should only be one if you've never done this before) should match the name you gave your Jenkins project when you set it up.
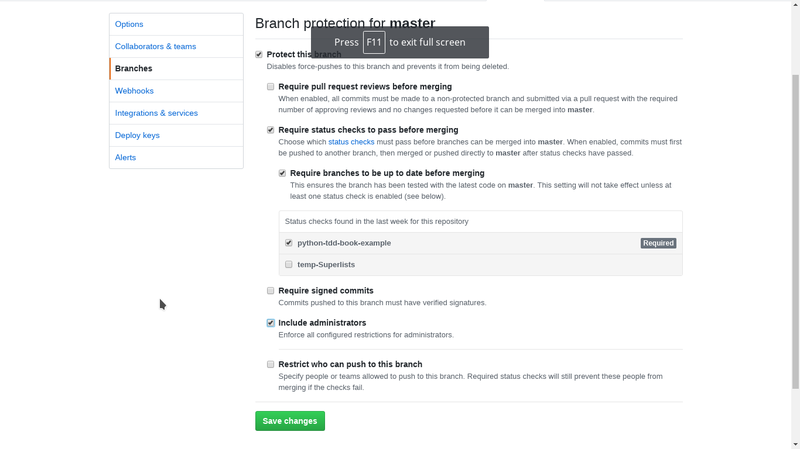
That's all I have to say about branch protection. It's quite useful and you can read more about it in the github documentation.
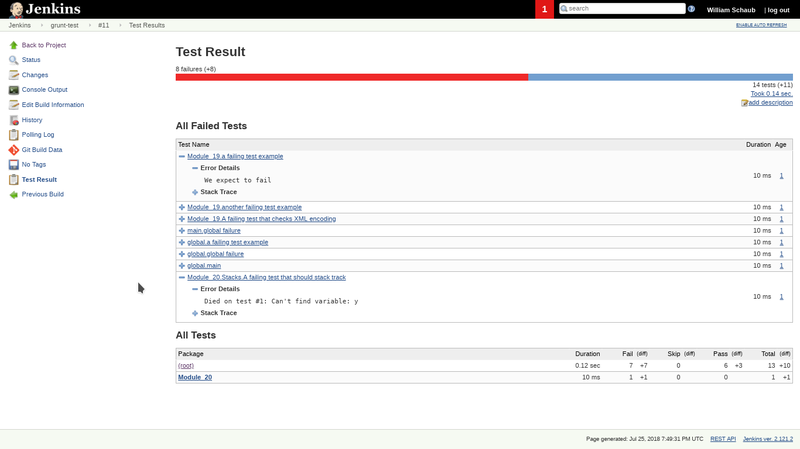
xUnit test reports
The last thing I have to offer for Jenkins config is giving us nice test reports when we run our tests with jenkins. This will help narrow down what happened in a failed build without looking at tons of console output. We get to see failed and passed tests in a nice little report like this:

The first step is to modify our python project to create JUnit test reports:
superlists/settings.py
Add the following code to your settings.py it will cause JUnit xml files to be created in tmp inside the directory where superlists is being "built" by jenkins.
if 'XUNIT_REPORT' in os.environ:
    TEST_RUNNER = 'xmlrunner.extra.djangotestrunner.XMLTestRunner'
    TEST_OUTPUT_VERBOSE = True
    TEST_OUTPUT_DESCRIPTIONS = True
    TEST_OUTPUT_DIR = './tmp'
We can test that it works locally by running pip install unittest-xml-reporting and running XUNIT_REPORT=1 python manage.py test lists
You should see output like this:
Creating test database for alias 'default'...
System check identified no issues (0 silenced).

Running tests...
----------------------------------------------------------------------
  test_form_renders_item_text_input (lists.tests.test_forms.ExistingListItemFormTest) ... OK (0.007s)
  test_form_save (lists.tests.test_forms.ExistingListItemFormTest) ... OK (0.002s)
  test_form_validation_for_blank_items (lists.tests.test_forms.ExistingListItemFormTest) ... OK (0.001s)
  test_form_validation_for_duplicate_items (lists.tests.test_forms.ExistingListItemFormTest) ... OK (0.001s)
  test_form_renders_text_input (lists.tests.test_forms.ItemFormTest) ... OK (0.001s)
  test_form_validation_for_blank_items (lists.tests.test_forms.ItemFormTest) ... OK (0.000s)
  test_CAN_save_same_item_to_different_lists (lists.tests.test_models.ItemModelTest) ... OK (0.002s)
  test_cannot_save_empty_list_items (lists.tests.test_models.ItemModelTest) ... OK (0.001s)
  test_default_text (lists.tests.test_models.ItemModelTest) ... OK (0.000s)
  test_duplicate_items_are_invalid (lists.tests.test_models.ItemModelTest) ... OK (0.001s)
  test_item_is_related_to_list (lists.tests.test_models.ItemModelTest) ... OK (0.001s)
  test_list_ordering (lists.tests.test_models.ItemModelTest) ... OK (0.001s)
  test_string_representation (lists.tests.test_models.ItemModelTest) ... OK (0.000s)
  test_create_new_creates_list_and_first_item (lists.tests.test_models.ListModelTest) ... OK (0.002s)
  test_create_new_optionally_saves_owner (lists.tests.test_models.ListModelTest) ... OK (0.001s)
  test_create_returns_new_list_object (lists.tests.test_models.ListModelTest) ... OK (0.001s)
  test_get_absolute_url (lists.tests.test_models.ListModelTest) ... OK (0.001s)
  test_list_name_is_first_item_text (lists.tests.test_models.ListModelTest) ... OK (0.001s)
  test_list_owner_is_optional (lists.tests.test_models.ListModelTest) ... OK (0.000s)
  test_lists_can_have_owners (lists.tests.test_models.ListModelTest) ... OK (0.000s)
  test_home_page_uses_item_form (lists.tests.test_views.HomePageTest) ... OK (0.011s)
  test_uses_home_template (lists.tests.test_views.HomePageTest) ... OK (0.003s)
  test_POST_redirects_to_list_view (lists.tests.test_views.ListViewTest) ... OK (0.009s)
  test_can_save_a_POST_request_to_an_existing_list (lists.tests.test_views.ListViewTest) ... OK (0.005s)
  test_displays_item_form (lists.tests.test_views.ListViewTest) ... OK (0.005s)
  test_displays_only_items_for_that_list (lists.tests.test_views.ListViewTest) ... OK (0.006s)
  test_duplicate_item_validation_errors_end_up_on_lists_page (lists.tests.test_views.ListViewTest) ... OK (0.006s)
  test_for_invalid_form_input_passed_form_to_template (lists.tests.test_views.ListViewTest) ... OK (0.009s)
  test_for_invalid_input_nothing_saved_to_db (lists.tests.test_views.ListViewTest) ... OK (0.010s)
  test_for_invalid_input_renders_list_template (lists.tests.test_views.ListViewTest) ... OK (0.009s)
  test_for_invalid_input_shows_error_on_page (lists.tests.test_views.ListViewTest) ... OK (0.009s)
  test_passes_correct_list_to_template (lists.tests.test_views.ListViewTest) ... OK (0.005s)
  test_uses_list_template (lists.tests.test_views.ListViewTest) ... OK (0.004s)
  test_my_lists_url_renders_my_lists_template (lists.tests.test_views.MyListTest) ... OK (0.005s)
  test_passes_correct_owner_to_template (lists.tests.test_views.MyListTest) ... OK (0.004s)
  test_can_save_a_POST_request (lists.tests.test_views.NewListViewIntegratedTest) ... OK (0.003s)
  test_for_invalid_input_doesnt_save_but_shows_errors (lists.tests.test_views.NewListViewIntegratedTest) ... OK (0.004s)
  test_list_owner_is_saved_if_user_is_authenticated (lists.tests.test_views.NewListViewIntegratedTest) ... OK (0.010s)
  test_save_creates_new_list_from_post_data_if_user_not_authenticated (lists.tests.test_forms.NewListFormTest) ... OK (0.001s)
  test_save_creates_new_list_with_owner_if_user_authenticated (lists.tests.test_forms.NewListFormTest) ... OK (0.001s)
  test_save_returns_new_list_object (lists.tests.test_forms.NewListFormTest) ... OK (0.001s)
  test_does_not_save_if_form_invalid (lists.tests.test_views.NewListViewUnitTest) ... OK (0.005s)
  test_passes_POST_data_to_NewListForm (lists.tests.test_views.NewListViewUnitTest) ... OK (0.002s)
  test_redirects_to_form_returned_object_if_form_valid (lists.tests.test_views.NewListViewUnitTest) ... OK (0.001s)
  test_renders_home_template_with_form_if_form_invalid (lists.tests.test_views.NewListViewUnitTest) ... OK (0.001s)
  test_saves_form_wtih_owner_if_form_valid (lists.tests.test_views.NewListViewUnitTest) ... OK (0.002s)

----------------------------------------------------------------------
Ran 46 tests in 0.168s

OK

Generating XML reports...
Destroying test database for alias 'default'...
There should now be a folder named tmp in your current directory and it should contain files like this:
tmp
├── TEST-lists.tests.test_forms.ExistingListItemFormTest-20180729213701.xml
├── TEST-lists.tests.test_forms.ItemFormTest-20180729213701.xml
├── TEST-lists.tests.test_forms.NewListFormTest-20180729213701.xml
├── TEST-lists.tests.test_models.ItemModelTest-20180729213701.xml
├── TEST-lists.tests.test_models.ListModelTest-20180729213701.xml
├── TEST-lists.tests.test_views.HomePageTest-20180729213701.xml
├── TEST-lists.tests.test_views.ListViewTest-20180729213701.xml
├── TEST-lists.tests.test_views.MyListTest-20180729213701.xml
├── TEST-lists.tests.test_views.NewListViewIntegratedTest-20180729213701.xml
└── TEST-lists.tests.test_views.NewListViewUnitTest-20180729213701.xml
- Add pytest-xunit.xsl to git in the same directory that manage.py lives in.
pytest-xunit.xsl is used later when we set up Jenkins to use these reports. I got it from here Alternatively and perhaps better in the long run you can follow the wiki page's guidance on how to install a custom XSL into jenkins so that it appears in the dropdown for xUnit instead.
- add the xUnit plugin from the Jenkins admin page.
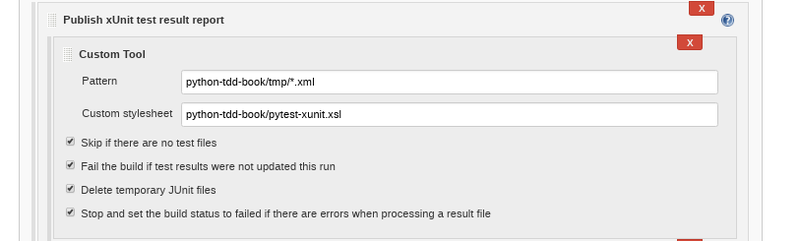
- go to your project's config page and add a postbuild step from the dropdown called "Publish xUnit test result report"
- set all the thresholds on the top row to zero
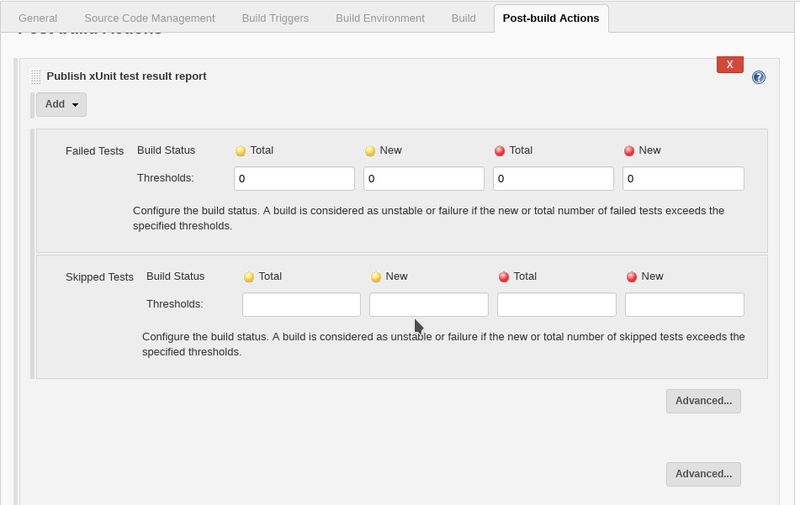
- Click the add dropdown and select custom tool. it should look like this when you are done. remove the python-tdd-book part if manage.py is in the root of your git (mine is slightly different layout)
Finally all that's left is a slight re-config of your build script inside virtualenv:
Virtualenv Builder script
XUNIT_REPORT=1
export XUNIT_REPORT
pip install -r requirements.txt
pip install selenium fabric3 unittest-xml-reporting
python manage.py test accounts lists
python manage.py test functional_tests
phantomjs lists/static/tests/runner.js lists/static/tests/tests.html
A few notes about the script. apart from setting the XUNIT_REPORT environment variable. we move the special install of functional test and jenkins build deps just after the pip install -r requirements.txt line. It's a lot easier to read the console output than where they put it in the book. It also groups everything logically into one step for python package management. The example in the book also has runner.js in a different path. I may have screwed this up in my repo so make sure it's the path to your runner.js please.
make a new branch with the source code changes (settings.py and our pytest-xunit.xsl) and push it up to github with git push -u origin our_new_branch_name.
Jenkins should see that we have done this and be building it for us. Go ahead and go to the github page and create a new pull request. You should see the status of the build and be restricted from merging until the build passes.
If everything goes well we will have a test results page and hopefully a successful build. If not look carefully over the console log for the build to determine what's up. If you're wondering about reporting for QUnit tests I have a better way to handle those in another article: A better way to run QUnit tests.