Exploring the PDP8
Oct. 11, 2018, 3:53 a.m. wschaub retrocomputing
I recently got pulled into a rabbit hole when I read an article about the PiDP8i project. I didn't have the money to get the real thing so this post will chronicle my experiences setting up a similar experience using the blinkenbone project instead.
Blinkenbone is a modified version of the SIMH project that provides a protocol to talk to either real or simulated front panels. it also includes java GUI front panels and ready to run software images for several different systems.
I was very surprised to see that my TOPS-10 image is included in the PDP-10 simulation.
However I was drawn to the PDP8i simulation instead. Blinkenbone is usable right out of the box but I wanted more software to play with so I found this projectto have a nice updated software environment for the PiDP8.
I downloaded and built it but did not install since I was only interested in the OS8 images and some of the other media contained within. (along with some of the cross build tools like palbart)
I copied what I was interested in into my pdp8i folder inside the extracted pre-built blinkenbone tarball.
you can find a copy of my stuff here
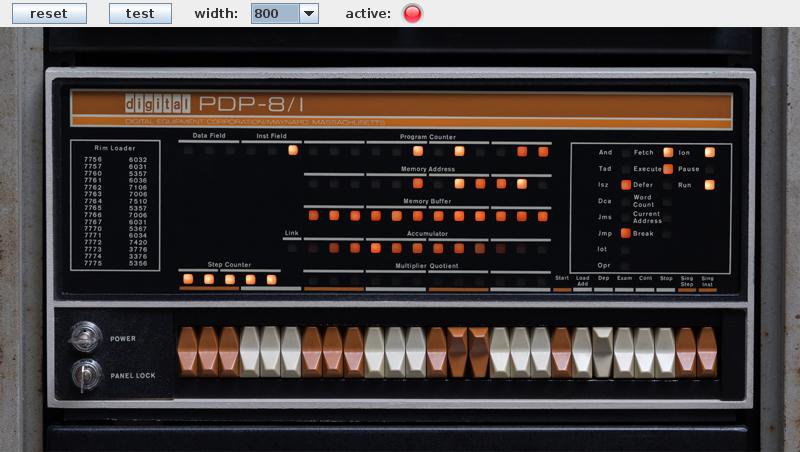
After about a week playing with the simulator like an obsessive compulsive madman I figured out that the step counter lights on the panel never lit up like I saw in videos of the real pidp8. I've submitted a pull request with a patch to the blinkenbone version of simh that fixes the problem for me.
The pull request includes a hastily hand assembled program to exercise the step counter. below is a more refined version assembled with palbart. Just load it into simh with load stepcounter.bin and then type run 100.
stepcounter.pal -- PAL compatible source code
stepcounter.bin -- BIN loader format paper tape image.
      / stepcounter.pal                                                   Page 1


    1              / stepcounter.pal
    2              / by William Schaub October 2018
    3              / This program demonstrates incrementing the step counter
    4              / on a properly equiped PDP8 with the
    5              / KE8-E Extended arithmetic element.
    6
    7              / This is mainly a test case for blinkenbone's panel.
    8              / If the SC lights do not light up then blinkenbone has not been patched.
    9
   10              //Tell PAL about some of the extended instructions.
   11        7431  SWAB=   7431    /Switch to mode B
   12        7747  SWBA=   7747    /Switch to mode A
   13        7521  SWP=    7521    /Swap MQ and AC
   14        7441  SCA=    7441    /STEP COUNTER TO AC
   15        7403  ACS=    7403    /AC(7:11) TO SC; AC CLEARED
   16
   17
   18        0100  *100                    / start addr
   19 00100  7431  LOOP,  SWAB            / Set mode B this
   20                                     /will cause AC to be deposited in MQ and AC to be cleard.
   21 00101  7521         SWP             /Swap MQ back to accumulator
   22 00102  7001         IAC             /Increment AC
   23 00103  7403         ACS             /Save AC to SC
   24 00104  7747         SWBA            /Switch back to mode A
   25 00105  7641         SCA CLA         /Store contents of SC into AC
   26 00106  4113         JMS DELAY
   27 00107  4113         JMS DELAY
   28 00110  4113         JMS DELAY
   29 00111  4113         JMS DELAY
   30 00112  5100         JMP LOOP        /continue
   31              /delay loop routine.
   32 00113  0000  DELAY, 0
   33 00114  2123  D1,     ISZ V1
   34 00115  5114          JMP D1
   35 00116  2123  D2,     ISZ V1
   36 00117  5116          JMP D2
   37 00120  2123  D3,     ISZ V1
   38 00121  5120          JMP D3
   39 00122  5513          JMP I DELAY
   40 00123  0001  V1, 1
   41              $

      No detected errors
      No links generated
Until I wrote this I've only done a small amount of assembler for the 6809 cpu on the Tandy Color Computer. The PDP8 is radically different than the 6809 but I feel that learning 6809 assembly helped me out a lot while exploring the PDP8.
So what is a step counter anyway? It appears to be part of an optional extension to the hardware that is described
here and here. I also got a lot of help from this nice instruction set reference card here
Using Pidp8 software with blinkenbone
The stock blinkenbone already comes with a demo OS8 image. but I wanted more.
The tangentsoft site already linked above has done a real labor of love and some exceptional engineering to produce a pristine OS8 image from original source tapes. They even went so far as to automate the build process with a special python class that can automate simh and interact with its console. In addition to OS8 there is a nice pre-built TSS8 image. this is all included in my google drive folder linked earlier in this document.
In order to use their software I opted to download their source code and build it myself. Instead of installing it I just copied the OS images directly from the source tree into the blinkenbone pdp8i folder. from there I just needed to create some new simh configs and launch scripts that pointed to them. (If you're using windows the launch scripts will be batch files but the simh config will remain the same and you will edit the batch files in the same way to point to the new simh config file. all referenced files in the simh config should reside inside your existing pdp8i folder)
pdp8i_empty.sh
This file simply launches my "empty" simh config. it's a bit misleading because in reality it already has an OS8 rk05 image mounted on rk0 and includes commands to deposit the rim loader, bin loader and rk05 bootstrap into memory.
It does not auto-boot however which allows me to do other things if I choose to. to boot you can either type boot rk0 at the simh prompt or load address 30 and press start on the console. The RIM loader and BIN loader works as you would expect it to in the DEC documentation (and other as a front panel toggling exercise probably not something you will be doing a lot. simh's load command supports both rim and bin formats and saves a lot of trouble in the long run. I also recommend looking into OS8's BOOT command as a nice time saver.)
# Start a PDP-8/I executing OS/8 with ADVENTure game

./_launch.sh "blinkenbone.panelsim.panelsimPDP8I.PanelsimPDP8I_app" "--width 1580 --power 1" pdp8i pdp8_realcons empty.simh_pdp8 248-blinkenbone-simulated-pdp8i-panel
This is just a copy of the original launcher script that comes with blinkenbone. the empty.simh_pdp8 is the only part that has been changed.
pdp8i/empty.simh_pdp8
This is the actual simh config described above it is meant to live inside the pdp8i folder inside your extracted blinkenbone release. You will want to copy v3d.rk05 from my google drive folder or from your own build (there's also a download available on the tangentsoft site, but the files are named somewhat differently, either way attach the rk05 image you choose in this file.
One last note:
reset all
reset -p
examine 0
dep pc 0
is just to blank the front panel after all those deposit commands so you start with a blank slate.
echo on
reset
set cpu 32K
set cpu noidle
set throttle 1m
set df disabled

set tti 7b
attach rk0 v3d.rk05
;Add RIM loader to core
dep 07755 7402
dep 07756 6014
dep 07757 6011
dep 07760 5357
dep 07761 6016
dep 07762 7106
dep 07763 7006
dep 07764 7510
dep 07765 5374
dep 07766 7006
dep 07767 6011
dep 07770 5367
dep 07771 6016
dep 07772 7420
dep 07773 3776
dep 07774 3376
dep 07775 5357
dep 07776 0000

;Add disk bootstrap to core
deposit 30 6743
deposit 31 5031

;go ahead and load the binloader into core too
load binloader.rim

reset all
reset -p
examine 0
dep pc 0
set realcons host=localhost panel=PDP8I
; To operate the PiDP8 of Oscar Vermeulen on a RPi with hostname "raspberrypi":
; set realcons host=raspberrypi panel=PiDP8

; We're running on a desktop PC with connection to localhost: max speed!
set realcons interval=1 connect

; show realcons

; After booting OS/8, start ADVENTURE.
; See https://raymii.org/s/articles/Running_ADVENT-on-the-PDP-8-with-SIMH.html
; Wait 2M cycles after start, 100k between chars.
;send after=2000000,delay=100000,"VERSION\rDIR ADVENT.*\rR FRTS\rADVENT.LD\r\e"

;boot rk0

; To start ADVENTURE:
; .R FRTS
;*ADVENT.LD
; <hit ESC>
; *$
; WELCOME TO ADVENTURE!!  WOULD YOU LIKE INSTRUCTIONS?
TSS8
For TSS8 you want to copy the following files from the media folder from the extracted tangentsoft sources (this is also included in my google drive folder)
- media/tss8/tss8_init.bin
- media/tss8/tss8_rf.dsk
You will then want to have a new launcher script that points to a simh config that looks like this.
pdp8i/tss8.simh_pdp8
echo on
reset
set cpu noidle
set throttle 1m
set rf enabled
set df disabled

attach rf tss8_rf.dsk
attach ttix 4000

set realcons host=localhost panel=PDP8I
; To operate the PiDP8 of Oscar Vermeulen on a RPi with hostname "raspberrypi":
; set realcons host=raspberrypi panel=PiDP8

; We're running on a desktop PC with connection to localhost: max speed!
set realcons interval=1 connect
; show realcons
load tss8_init.bin
echo run 24200
run 24200
For instructions I will just point you to this excellent blog post instead of repeating it here.
I have included the TSS8 manuals in my google drive folder.