Building kermit for NOS2
March 18, 2019, 10:43 p.m. wschaub retrocomputing
This post describes the process of building kermit for NOS version 2 using dtcyber and the CybisRelease1 kit for running your own PLATO system.
I plan on this being the first in a series of posts about NOS and CYBIS/PLATO in general.
Building kermit isn't strictly necessary since xmodem is already supported on the NOS side. but this was simply a
learning exercise for me to get more familiar with the system myself.
I learn about various retro systems as a hobby and this particular one ties into another project I've been involved with
which uses all of this called irata.online. (none of this would be possible without the efforts of cyber1.org, you should check them out
and also read up on the history of PLATO at The Friendly Orange Glow)
Before I get started I should link to the tape I already produced you can find it here: NOSKermit.zip
This article is mainly for the curious and hopefully will kick off more articles about working with PLATO and NOS.
I don't cover starting up the emulator, all that is covered on the CybisRelease1 page linked above.
Why KERMIT?
I wanted to play around with the operating system that PLATO (also called CYBIS) lives on top of, since I mainly have a sysadmin background I wanted to learn how to build some software on it. I also wanted something nice to use to transfer things in and out of the emulator with.
There's just one problem: there's really not a lot of publicly available software or source code available for NOS. The CybisRelease1 kit is the only publicly available distribution of it that I know about. Thankfully there is a fantastic software project that solves both of our problems:
Kermit is not only a great protocol for getting files between very alien systems but over the years it's been written for literally just about every system you can think of(several implementations for the same platform in some cases) , and it just so happens that they have a version written in COMPASS for NOS 2.2
Getting from here to there
The biggest problem with a mainframe emulator like this one is getting information in and out of it, particularly when we have something that we don't currently have a disk or tape image already available to work with.. We not only need to put information like source code into the system, but we need to be able to do so in a format that the mainframe understands. Thankfully there's a few tools for that.
The few ways that I've found are:
- interactively via an ASCII terminal via port 6610 using the clunky line editor or the fullscreen editor (more about that in a moment)
- via XMODEM transfer using the NOS xmodem command.
- via kermit, assuming you have it installed.
- using dtcyber's punched card reader emulation which seems to do translation on the fly from a plain ascii file to what looks like a valid card deck on the mainframe end.
We are going to initially use option 2. The last option also works but I will cover that in another post.
Before we get to using the tools and uploading though Let's talk about how NOS treats files. (at least as far as I understand it currently)
It's a file, Jim, but not as we know it.
NOS like any operating system has the concept of a file, however working with files is not as simple as giving a filename as an argument to a command. You have to attach a file to your job first and there are three types of files local, indirect and direct files.
local files
the first type of file is one that is entirely temporary unless you decided to make it a permanent file via a command. these types of files are normally created via utilities, or requested for your use via other commands. they only exist as long as your job is alive and vanish when you sign out or your batch run ends.
Initially when we upload a file via xmodem and it requests a name and we upload to that file name it in fact is this special type of file. we have to tell the system to save that file as either a direct or indirect file or it will simply vanish and you will wonder what happened.
indirect files:
indirect files are files that you use the get command to load off disk into memory. Nothing you do to these files will touch what is on disk unless you tell the system to put those changes back onto disk. indirect files are created by taking a local file name and passing it to the save command. In order to update an indirect file you must use the replace command instead.
direct files:
direct files are more like the plain old files we are used to on a PC. any modifications to these files changes what is on the disk without needing to commit them with a command. direct files are best for large files and have better performance. you create a direct file by using the define command instead of save.
NOS manuals:
If you want to get serious with NOS, or even just poke around you will want to have the following manuals handy:
general system usage and commands:
NOS2 Reference set volume 1 introduction to interactive usage.
NOS2 reference set volume 2 guide to system usage
NOS2 Reference set volume 3 system commands
NOS Version 2 Network Terminal Instant
COMPASS assembler, full screen editor
COMPASS Version 3 Reference Manual
Full Screen Editor User's Guide
There are many many more at http://bitsavers.informatik.uni-stuttgart.de/pdf/cdc/cyber/ but these should provide enough to follow along here. I plan on doing another article soon on NOS development as I learn more about it.
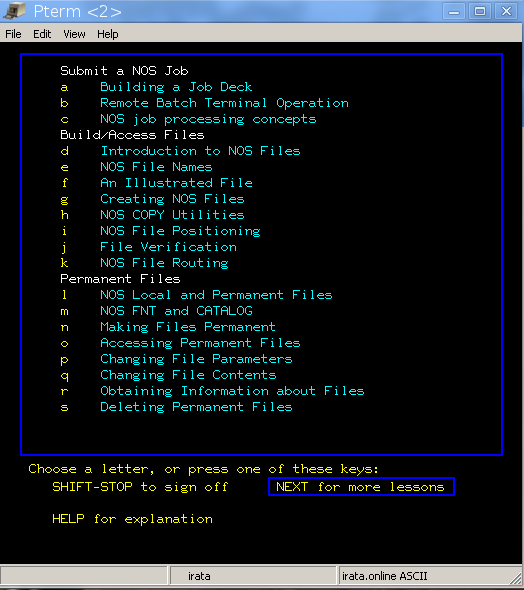
PLATO lessons
There are also great lessons on both COMPASS and NOS inside PLATO that are fantastic for learning how it all works.
This system will be alien to most everyone except old school CDC people and people that have used other similar mainframe operating systems. The lessons start out talking about punched cards and batch jobs but don't let that fool you. NOS is very powerful and is capable of handling both batch and interactive jobs quite well.
nosguide/cnos
on irata.online I have a user called nosguide of group cnos. If you get a plato terminal and log into irata.online port 8005
and log in as this user you will get a nice menu of plato lessons covering most general usage of NOS.
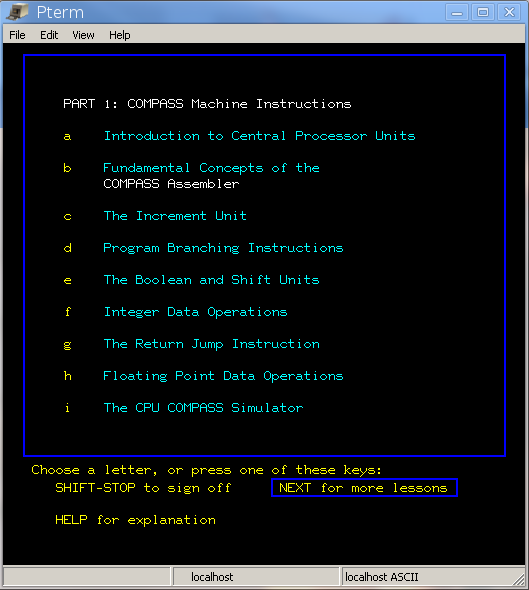
plato compass course:
This course is not necessary for this article but it is a fantastic introduction to programming in COMPASS and
even has a full Cyber 66xx CPU simulator that can judge programming assignments based on the final state of the
simulator.
Instructor file 0pseudoif contains a detailed course on COMPASS.
the best way to use this course is from your local install of PLATO which presumably you have if you are using this article.
to use it you want to roster in a student by going through the following steps logged in as admin/s
- from the SYSTEM MODE prompt type author
- select option 2
- select option c
- select option 1
- give the student a name (let's just call it compass)
- press lab
- press NEXT (enter)
- press DATA
- select option 5
- select option b
- type mrouter and press NEXT
- select option c
- type 0pseudoif and press NEXT
- press back until you are at the main screen and then Shift-STOP to log out
Once that is all done you can log in as user compass and group author to take the COMPASS course.
PLATO will track your progress and you will always be dropped back in where you left off.
Getting down to business
Now that we've gotten the documentation and other background stuff out of the way, let's get started trying to build Kermit.
First we need to download the source code, next we need to be sure it's in CRLF (MS-DOS) format so that it gets uploaded correctly in the next step. I use the unix2dos tool for this.
RTFM
Included with the sources is everything you really need to know about building and running this thing, most of this article beyond getting it up into NOS is just following the instructions plus overcoming a few unexpected bumps along the way.
cybker.bwr contains the reason why this particular version of kermit was developed.
cybker.gen contains detailed instructions on how to actually build this thing
cybker.usr is a detailed user manual meant for printing
Two files need to be uploaded, and one file needs to be created by hand (the KERMIT procedure described in cybker.gen)
cybker.asm The assembly source code
cybkerhlp.txt a procedure to create the structured help file required by KERMIT
xmodem transfer
In order to transfer the kermit sources up to NOS we need a terminal emulator, Tom Hunter has provided a copy of TerraTerm at http://www.controlfreaks.org/twiki/pub/Main/DtCyber/TeraTermPro23.zip
You can run this nicely on Linux via wine, which is how I use it.
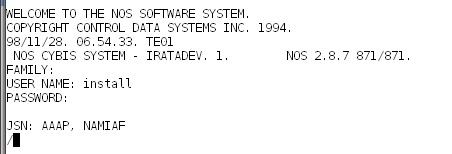
you will want to connect to localhost port 6610, When asked for a family just hit enter then use install for the user name and install for the password
you will get a prompt that looks like:
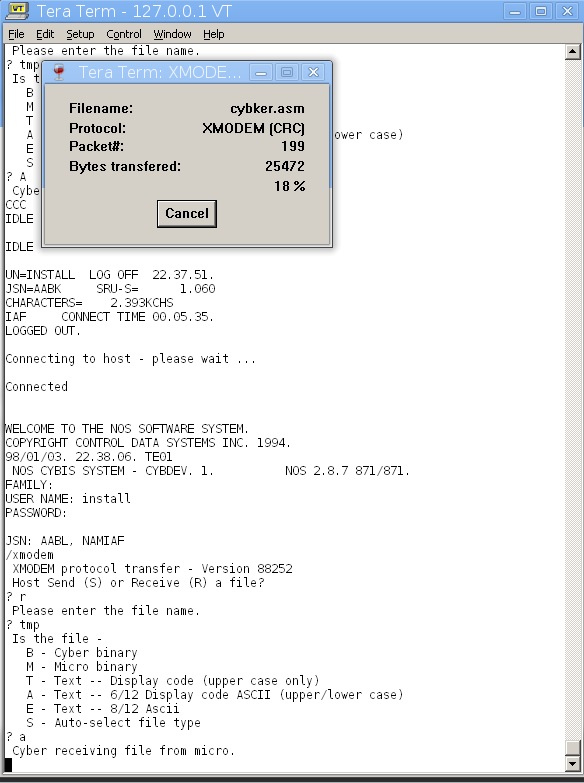
Next type xmodem and select R
tell it to use the file name tmp and then choose option A (this is important!)
when it says "Cyber reciving file from micro." go to File->Transfer->Xmodem->Send and send the cybker.asm file
This needs to be done fairly quickly to avoid a hang.
after sending the file everything you type will no longer echo.
type save(tmp) followed by a return and then type bye, reconnect and log back into the install account.
if you type catlist you will now see a TMP file listed under indirect files.
We now need to convert it to display code format, as per the instructions we need to do:
get(tmp)
fcopy(p=tmp,n=krmsrc,pc=ascii,nc=dis,r)
save(krmsrc)
Now comes an important step. We need to remove a line of garbage from the end of our newly converted source file.
for that we use the full screen editor.
type the following:
screen,tterm
get(krmsrc)
fse,krmsrc
You will get a nice display like the following:
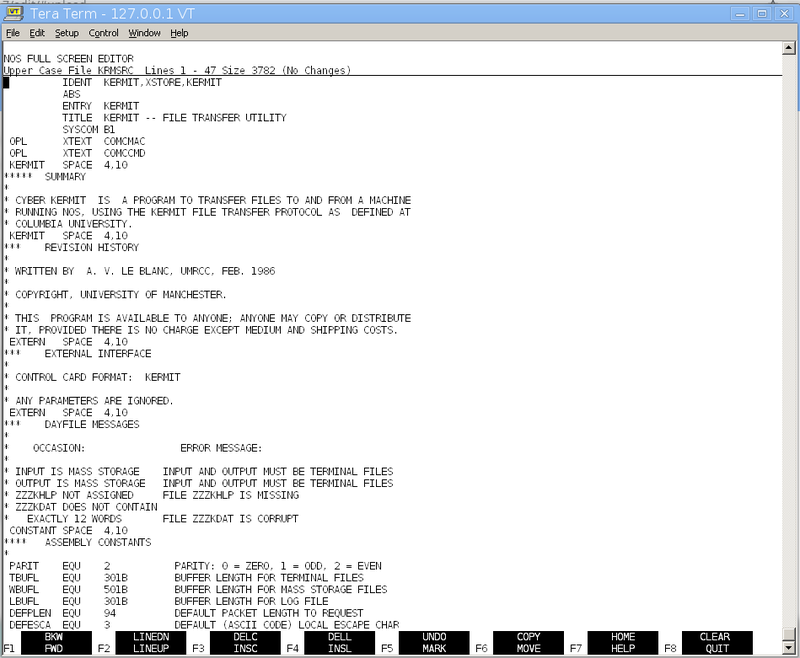
Hit f2 (careful not to hit it too fast, because you can scramble the display)
until you reach the end of the file. it should look like this:
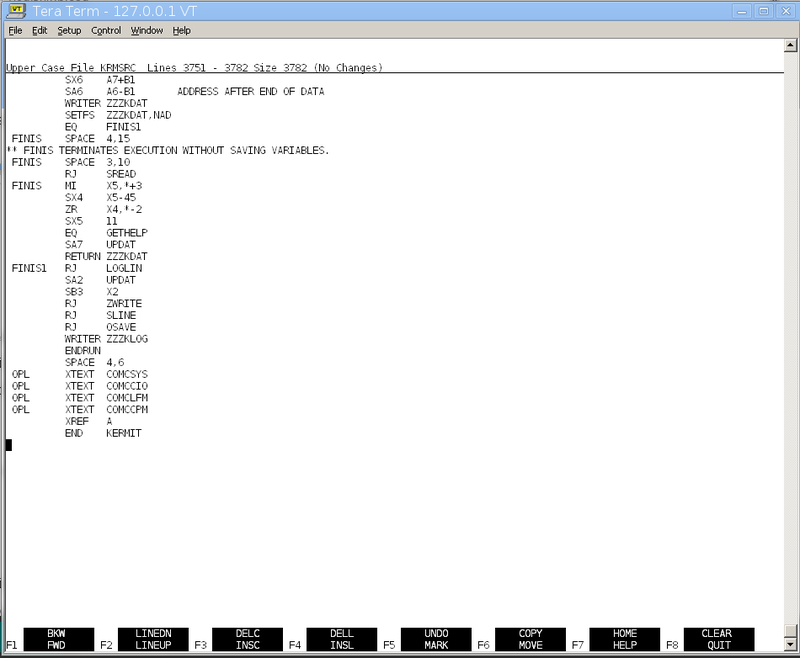
This looks fine but in reality, there's an invisible blank line that we need to remove to avoid an assembler error.
position the cursor (using the arrow keys) to just below the END KERMIT line and hit shift-F4 until the cursor moves up to the same line as END KERMIT. Once that happens hit F8 and type replace(krmsrc) to re-save the file.
Next we upload the procedure for creating the help file:
type purge(tmp)
type xmodem, hit enter and go through the same process we went through for cybker.asm only this time upload the file cybkerhlp.txt
remember to type save(tmp) and hit enter after you finish uploading. then type bye and enter and reconnect.
We are going to convert this file to display code format as well:
get(tmp)
fcopy(p=tmp,n=mkhlp,pc=ascii,nc=dis,r)
mkhlp
save(zzzkhlp)
we now have all the files needed to build kermit, but we still need the procedure file for running it.
this we will create by hand before moving on to actually building and installing kermit on NOS.
run the following:
screen,tterm
fse,kermit
next open up the file cybker.gen and copy/paste line by line (FSE doesn't cope well with big pastes) the KERMIT procedure until your screen looks like this one:
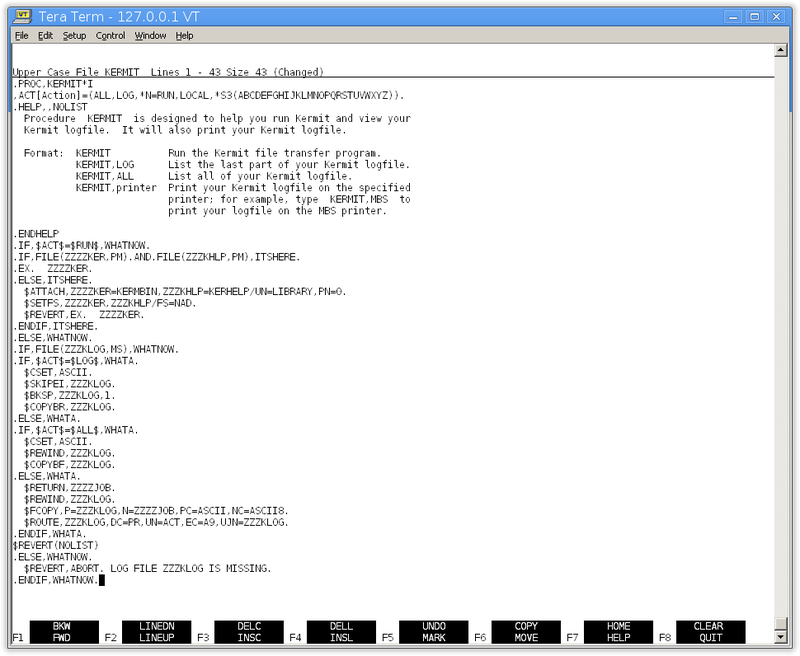
Type F8 and then save(kermit)
Building kermit.
Finally, we are ready to build kermit.
attach(opl=opl871)
get(krmsrc)
compass(i=krmsrc,b=kermbin)
You will end up with a nice assembly listing that you can save to a file by copy-pasting from terraterm.
next you will want to verify that we ended up with an executable. The following should appear on your screen if you type
itemize(kermbin)
          ITEMIZE OF KERMBIN        FILE     1
    REC   NAME      TYPE          LENGTH   CKSUM     DATE

      1   KERMIT    ABS             5446    0603  98/01/03.
           KERMIT      5242


          * EOI *       SUM =       5446
 ITEMIZE COMPLETE.
If there is an errors file, there is something wrong. otherwise if it looks like the above just type
save(kermbin)
we are now ready to install kermit system wide.
Installing kermit.
The next steps are best done under the emulator console (the screen with the green text) This is because we can't enter the library account as an interactive user.
NOS doesn't really have the concept of directories, files live under a user index, in this case the KERMIT procedure expects to find the kermit files under account library.
type the following on the console:
X.DIS.
USER(INSTALL,INSTALL)
GET(KBIN=KERMBIN,KHLP=ZZZKHLP)
USER(LIBRARY,LIBRARY)
COPYBF(KBIN,KERMBIN)
COPYBF(KHLP,KERHELP)
DEFINE(KERHELP/CT=PU,M=R)
DEFINE(KERMBIN/CT=PU,M=R)
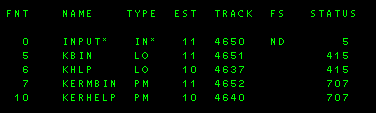
Make sure that the display for KERMBIN and KERHELP looks like this.
The TYPE field should have changed from LO to PM
You can now type DROP. and hit enter to get out of the DIS display.
We only have one more step left, an it can be handled from terraterm interactively.
Building a new deadstart tape
This step sounds quite scary but it's necessary if we want to make kermit a system wide command (at least as far as I know currently, if anyone with a real CDC background is reading this post I would love to know better ways to deal with all of this in the comments section)
The deadstart tape basically contains most of the operating system and is what is loaded at boot time. It's essentially a large library file called SYSTEM that is available at all times. any programs or procedures that live on the deadstart will be found when you type their name on the command line, because this library is automatically searched.
Those that are curious can type:
common(system)
itemize(system,n,u) to see a list of everything contained inside the deadstart.
Now, on with the fun. First we need to create and load a new tape image file:
you can do this by finding the command window you started dtcyber under and typing this under the Operator> prompt.
lt 13,0,1,w,newdeadstart.tap
Next go back into terraterm and type in the following commands. Ignore everything after ** since those are comments by me and not meant to be typed in.
if you see a ? on the screen those are where you will enter in directives like *build system and hit enter.
if you run out of directives to type in just hit enter again to end the input.
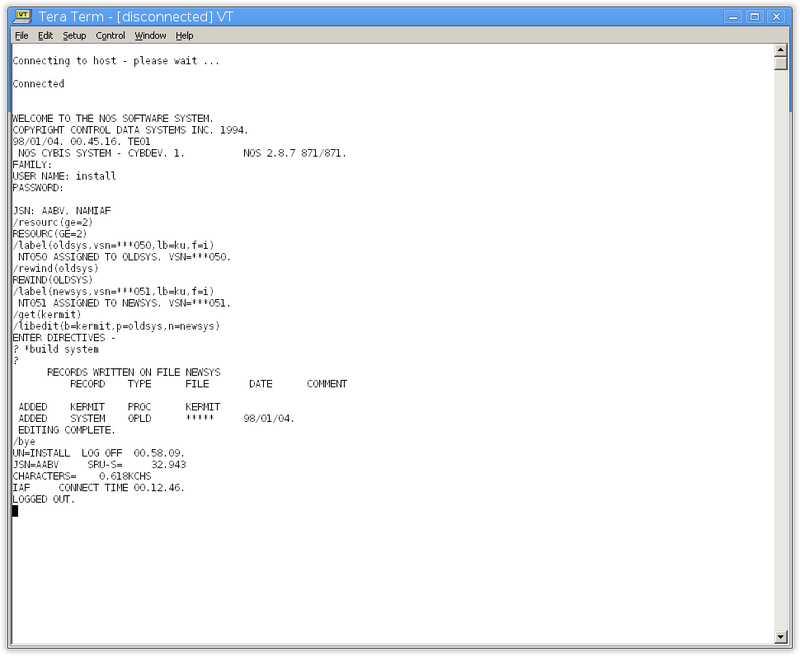
resourc(ge=2)      **  allow two tape drives to be used at once
label(oldsys,vsn=***050,lb=ku,f=i)  ** attach the current deadstart tape to the job as oldsys
rewind(oldsys)      ** make sure old DS tape is rewound
label(newsys,vsn=***051,lb=ku,f=i)   ** attach our new blank tape that will become the new DS tape
get(kermit)       **   attach the kermit procedure to our job
libedit(b=kermit,p=oldsys,n=newsys)  **read in oldsys, copy to newsys, ins or replace anything  in b=...
?*build system     ** tell libedit to generate the directory named SYSTEM
?          ** press return at this point to get out of libedit. don't press ?
bye     ** end the job
Once you press return on the second ? it will pause for a while. On the console you may see something like this
with file names rapidly flashing by:
If you entered all the commands correctly your terraterm screen should look a lot like this with no obvious error messages:
We now have a brand new deadstart. the message in the report from libedit
says that it insertted a procedure named KERMIT from file KERMIT and generated a brand new library directory named SYSTEM.
It's time to shut down and boot the new deadstart.
Booting our new deadstart
bring up the console window (I'm assuming CYBIS is not running, if it is follow the directions for shutting it down in the PDF manual that is on the CybisRelease1 website)
and type UNLOCK.
CHECK POINT SYSTEM.
after a while the console display should be mostly blank and a message saying:
CHECKPOINT COMPLETE. will be near the bottom right hand corner.
type STEP. and be sure you see the word STEP in the top left of the console display.
then type shutdown at the Operator> prompt in the command window where dtcyber was started.
edit cyber.ini and change the line:
MT679,0,0,13,Deadstart/CYBIS_15DS.tap
to
MT679,0,0,13,newdeadstart.tap
start dtcyber again and load up NOS. log in with terraterm and type kermit
you should be greeted with:
WELCOME TO THE NOS SOFTWARE SYSTEM.
COPYRIGHT CONTROL DATA SYSTEMS INC. 1994.
98/02/01. 00.01.22. TE01
 NOS CYBIS SYSTEM - CYBDEV. 1.          NOS 2.8.7 871/871.
FAMILY:
USER NAME: sys
PASSWORD:

JSN: AAAM, NAMIAF
/kermit
 Cyber Kermit>
you can type help for online help, or refer to the manual that came with cyber kermit.
you can use C-Kermit on linux or windows, or any other system with TCP support to connect on port 6610 in raw-socket mode to upload and download files to NOS now. Enjoy.
This is mainly here to document how I built kermit, if you want to just install it on your copy of CybisRelease1, you can download the NOSKermit.zip file and follow the instructions in README.txt instead. I have an automated script that will install a pre-built kermit from the provided tape image.